12
Sep
2020
SwiftUI Alert with TextField
Reading time: 2 min
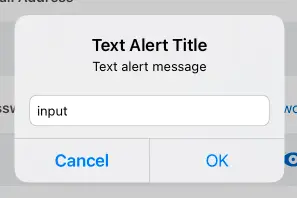
This recipe shows how to add a TextField to a SwiftUI alert dialog.
The end result looks like this:

The dialog supports:
- Custom title and message.
- Text field with a placeholder and keyboard type.
- Confirm button, whose callback returns the content of the text field.
- Optional secondary button and its callback.
- Optional cancel button.
Start by adding this struct to model the alert dialog:
public struct TextAlert {
  public var title: String // Title of the dialog
  public var message: String // Dialog message
  public var placeholder: String = "" // Placeholder text for the TextField
  public var accept: String = "OK" // The left-most button label
  public var cancel: String? = "Cancel" // The optional cancel (right-most) button label
  public var secondaryActionTitle: String? = nil // The optional center button label
  public var keyboardType: UIKeyboardType = .default // Keyboard tzpe of the TextField
  public var action: (String?) -> Void // Triggers when either of the two buttons closes the dialog
  public var secondaryAction: (() -> Void)? = nil // Triggers when the optional center button is tapped
}
Next, add this extension that builds a UIAlertController based on the model above:
extension UIAlertController {
  convenience init(alert: TextAlert) {
    self.init(title: alert.title, message: alert.message, preferredStyle: .alert)
    addTextField {
       $0.placeholder = alert.placeholder
       $0.keyboardType = alert.keyboardType
    }
    if let cancel = alert.cancel {
      addAction(UIAlertAction(title: cancel, style: .cancel) { _ in
        alert.action(nil)
      })
    }
    if let secondaryActionTitle = alert.secondaryActionTitle {
       addAction(UIAlertAction(title: secondaryActionTitle, style: .default, handler: { _ in
         alert.secondaryAction?()
       }))
    }
    let textField = self.textFields?.first
    addAction(UIAlertAction(title: alert.accept, style: .default) { _ in
      alert.action(textField?.text)
    })
  }
}
Now it's time to make use of UIViewControllerRepresentable to render the alert dialog in the hosting view controller:
struct AlertWrapper<Content: View>: UIViewControllerRepresentable {
  @Binding var isPresented: Bool
  let alert: TextAlert
  let content: Content

  func makeUIViewController(context: UIViewControllerRepresentableContext<AlertWrapper>) -> UIHostingController<Content> {
    UIHostingController(rootView: content)
  }

  final class Coordinator {
    var alertController: UIAlertController?
    init(_ controller: UIAlertController? = nil) {
       self.alertController = controller
    }
  }

  func makeCoordinator() -> Coordinator {
    return Coordinator()
  }

  func updateUIViewController(_ uiViewController: UIHostingController<Content>, context: UIViewControllerRepresentableContext<AlertWrapper>) {
    uiViewController.rootView = content
    if isPresented && uiViewController.presentedViewController == nil {
      var alert = self.alert
      alert.action = {
        self.isPresented = false
        self.alert.action($0)
      }
      context.coordinator.alertController = UIAlertController(alert: alert)
      uiViewController.present(context.coordinator.alertController!, animated: true)
    }
    if !isPresented && uiViewController.presentedViewController == context.coordinator.alertController {
      uiViewController.dismiss(animated: true)
    }
  }
}
Finally, add this covenient extension that allows you to show a TextAlert on any SwiftUI View, just like you would with a regular alert:
extension View {
  public func alert(isPresented: Binding<Bool>, _ alert: TextAlert) -> some View {
    AlertWrapper(isPresented: isPresented, alert: alert, content: self)
  }
}
Now you can use the TextAlert extension on any view:
@State private var showDialog = false

var body: some View {
  VStack {
    Text("Some text")
  }.alert(isPresented: $showDialog,
            TextAlert(title: "Title",
                          message: "Message",
                          keyboardType: .numberPad) { result in
              if let text = result) {
                // Text was accepted
              } else {
                // The dialog was cancelled
              }
            })
}