20
Aug
2021
Search bar in SwiftUI (Updated 08/21)
Reading time: 2 min
This tutorial shows you how to create a search bar in SwiftUI. There are two ways of doing it:
- Create a custom view, which works on any SwiftUI Version.
- Use the
searchablemodifier, introduced in Swift 3.
Custom Search Bar View
The end result will look something like this:

The search bar has a button to clear its content, as well as to hide itself with the Cancel button.
struct SearchBar: View {
    @Binding var isShowing: Bool // determines visibility
    @Binding var text: String // the inputted search text
    @State private var isEditing = false

    var body: some View {
        Group {
            // If the bar should be shown, render it, otherwise
            // use an EmptyView
            if isShowing {
                HStack {
                    TextField("Search...", text: $text)
                        .padding(7)
                        .padding(.horizontal, 25)
                        .background(Color(.systemGray6))
                        .cornerRadius(8)
                        .overlay(HStack { // Add the search icon to the left
                            Image(systemName: "magnifyingglass")
                                .foregroundColor(.gray)
                                .frame(minWidth: 0, maxWidth: .infinity, alignment: .leading)
                                .padding(.leading, 8)

                            // If the search field is focused, add the clear (X) button
                            if isEditing {
                                Button(action: {
                                    self.text = ""
                                }) {
                                    Image(systemName: "multiply.circle.fill")
                                        .foregroundColor(.gray)
                                        .padding(.trailing, 8)
                                }
                            }
                        }).padding(.horizontal, 10)
                        .onTapGesture {
                            self.isEditing = true
                        }

                    // If the search field is focused, render the "Cancel" button
                    // to the right that hides the search bar altogether
                    if isEditing {
                        Button(action: {
                            self.isEditing = false
                            self.text = ""
                            self.isShowing = false
                            // Dismiss the keyboard
                            UIApplication.shared.sendAction(#selector(UIResponder.resignFirstResponder), to: nil, from: nil, for: nil)
                        }) {
                            Text("Cancel")
                                .foregroundColor(.white)
                        }.padding(.trailing, 10)
                        .transition(.move(edge: .trailing))
                        .animation(.default)
                    }
                }
            } else {
                EmptyView()
            }
        }
    }
}
Searchable Modifier
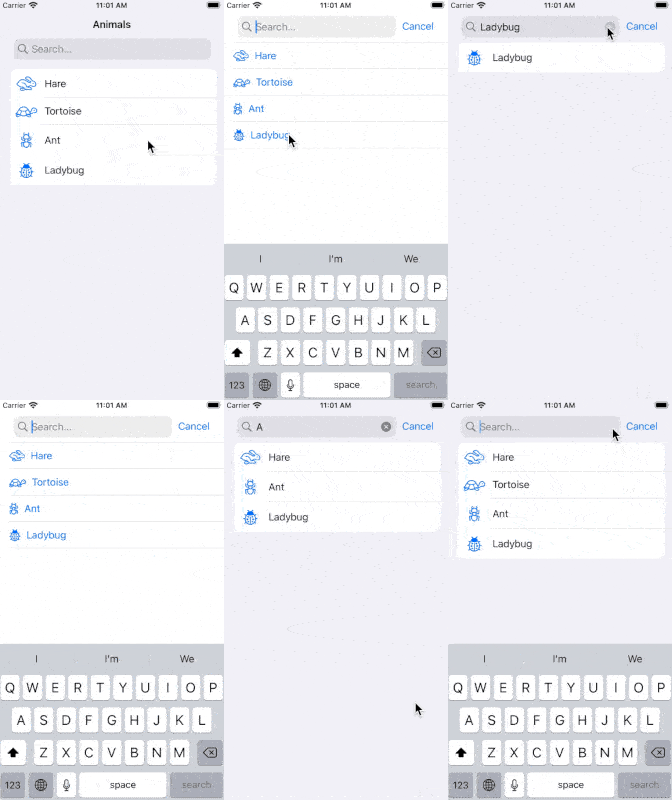
The end result looks like this:

This code works starting SwiftUI 3 (iOS 15, macOS 12).
The recipe goes as follows:
- Add the
searchablemodifier to your view, which must be embedded in aNavigationView. - Specify the
Stringbinding for the search text, the search bar placement and its prompt. - Optionally specify a list of search suggestions, marking each entry view with
searchCompletion.
Here's the code for the example above:
let animals = ["Hare", "Tortoise", "Ant", "Ladybug"]
@State private var searchText = ""

var filteredAnimals: [String] {
  searchText.isEmpty
    ? animals
    : animals.filter { $0.lowercased().contains(searchText.lowercased()) }
}

var body: some View {
  NavigationView {
    List(filteredAnimals, id: \.self) { animal in
      label(for: animal)
    }
    .searchable(text: $searchText,
                  placement: .toolbar,
                  prompt: "Search...") {
      ForEach(animals, id: \.self) { animal in
        label(for: animal)
          .searchCompletion(animal)
      }
    }
    .navigationTitle("Animals")
    .navigationBarTitleDisplayMode(.inline)
  }
}

private func label(for animal: String) -> some View {
  Label(animal, systemImage: animal.lowercased())
}
On iOS, the searchable placement parameter doesn't seem to have much effect.