Reading time: 3 min
This recipe shows how to implement navigation in SwiftUI using NavigationStack. It makes both declarative and programmatic navigation dead easy, allowing for simple transitions both forwards and backwards, including a full stack unwind.
NavigationStack is SwiftUI 4 replacement for NavigationView which successfuly improves many of its predecessor's shortcomings, namely in the realm of programmatic navigation. If you're interested in a feature-rich replacement for NavigationView, check out our SwiftUI Segues recipe.
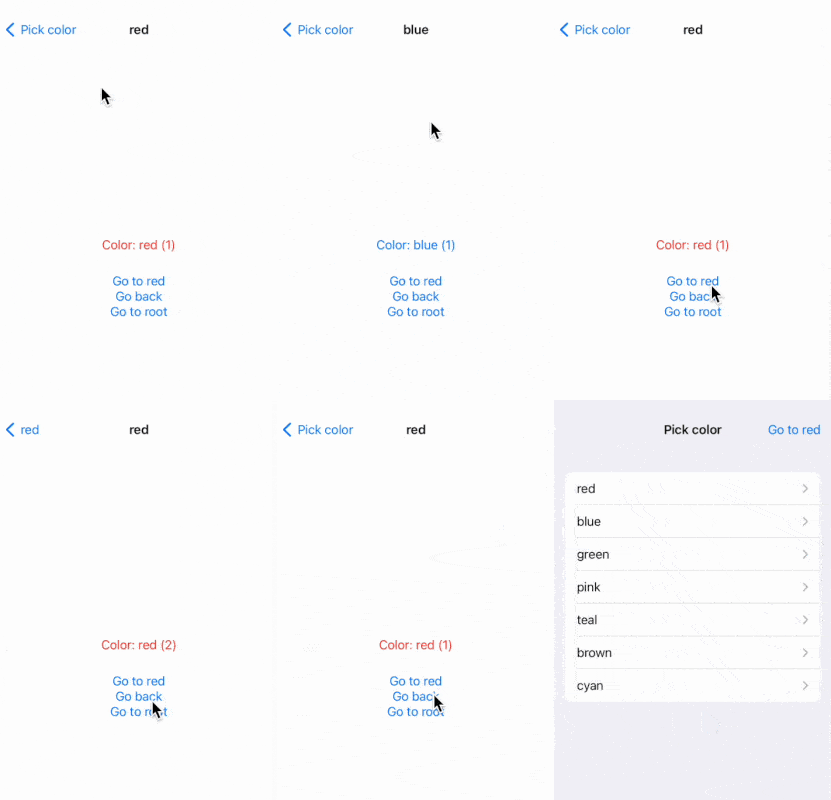
The end result looks like this:

NavigationStack is available starting in SwiftUI 4 (iOS 16, macOS 12.4).
Declarative navigation
To use the new SwiftUI navigation, wrap some NavigationLinks inside a NavigationStack. Each link will have a unique Hashable value associated with it and triggering the link (by tapping it) will route the stack to that value. Then, add a navigationDestination modifier to one of NavigationStack's children and map the current path value to a view:
NavigationStack {
  List([Color.red, .blue, .green, .pink, .teal, .brown, .cyan],
      id: \.self) { color in
    NavigationLink(color.description, value: color)
  }
  .navigationDestination(for: Color.self) { color in
    Text("Color: \(color.description)")
  }
}
Programmatic navigation
A NavigationStack can share its internal stack via an array binding in its initializer. This state variable can then be used to manipulate the stack in an easy-to-understand way: e.g, pushing a new view onto the stack is done by appending a new value to the path array:
@State private var navigationPath: [Color] = [] // stack path

var body: some View {
  NavigationStack(path: $navigationPath) {
    List([Color.red, .blue, .green, .pink, .teal, .brown, .cyan],
        id: \.self) { color in
      NavigationLink(color.description, value: color)
    }
    .navigationDestination(for: Color.self) { color in
      VStack {
        // you can query the stack path to figure out the current navigation hierarchy
        Text("Color: \(color.description) (\(navigationPath.filter { $0 == color }.count))")
          .foregroundColor(color)
          .padding(20)
      }
      .navigationTitle(navigationPath.last?.description ?? "Pick color")
    }
    .navigationTitle("Pick color")
    .navigationBarTitleDisplayMode(.inline)
    .toolbar {
      ToolbarItem(placement: .navigationBarTrailing) {
        redButton
      }
    }
  }
}

private var redButton: some View {
  Button("Go to red") {
    navigationPath.append(.red) // programmatic navigation
  }
}
Navigating back
Using the NavigationStack path makes it dead easy to pop views from the stack by simply removing items from the end of the path array:
// ... everything same as in previous example ...
.navigationDestination(for: Color.self) { color in
  VStack {
    // you can query the stack path to figure out the current navigation hierarchy
    Text("Color: \(color.description) (\(navigationPath.filter { $0 == color }.count))")
        .foregroundColor(color)
        .padding(20)

    Button("Go back") { // pop the view
      navigationPath.removeLast()
    }
  }
  .navigationTitle(navigationPath.last?.description ?? "Pick color")
}
// ... everything same as in previous example ...
Unwind to root
Just as with moving forwards of backwards in the stack, the NavigationStack's path binding allows you to fully unwind the stack all the way to the root view by removing all elements from the path array:
// ... everything same as in previous example ...
.navigationDestination(for: Color.self) { color in
  VStack {
    // you can query the stack path to figure out the current navigation hierarchy
    Text("Color: \(color.description) (\(navigationPath.filter { $0 == color }.count))")
        .foregroundColor(color)
        .padding(20)

    Button("Go back") {
      navigationPath.removeLast()
    }

    Button("Go to root") { // unwind to root
      navigationPath.removeAll()
    }
  }
  .navigationTitle(navigationPath.last?.description ?? "Pick color")
}
// ... everything same as in previous example ...